Origami Monster Bookmark Craft

Halloween is just around the corner and we have the perfect activity for you and your children to enjoy. These origami monster bookmarks are sure to keep the kiddies entertained after a night of trick-or-treating!
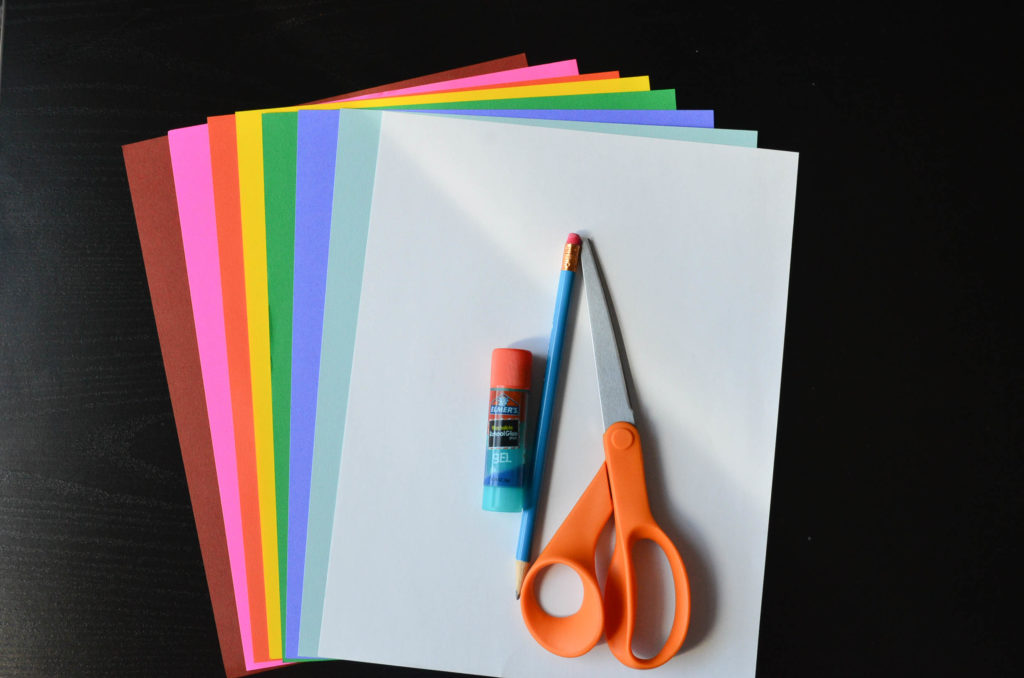
What You Need:
- Assorted Construction Paper
- Scissors
- Glue Stick
- Pencil
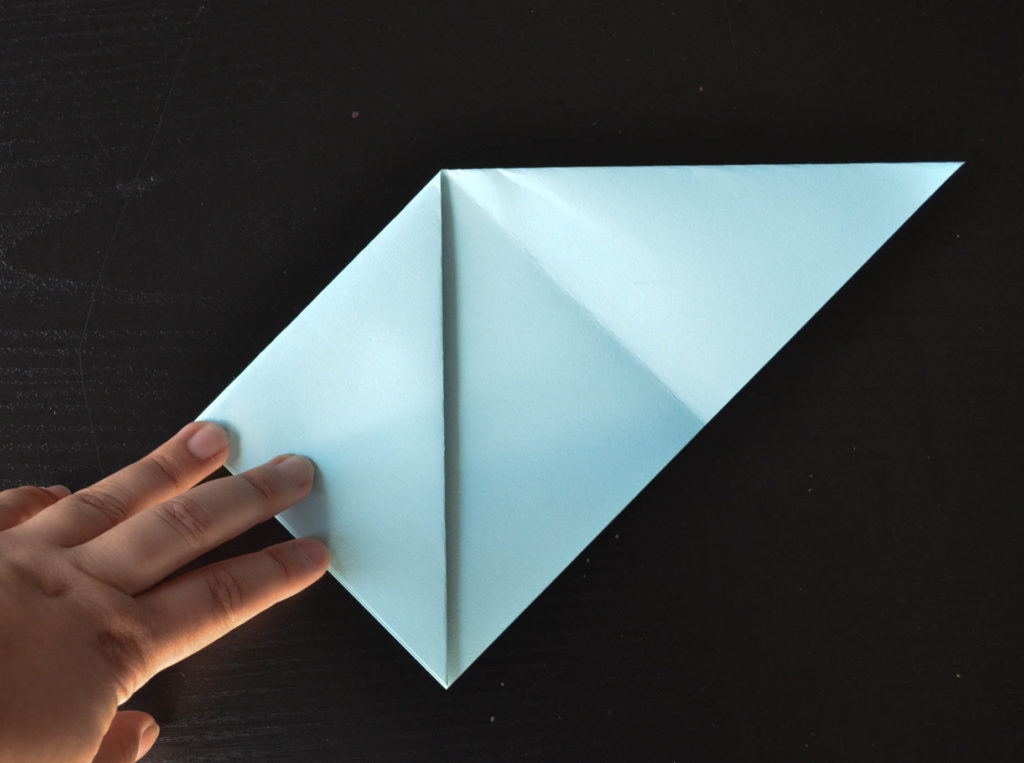
Step 1:
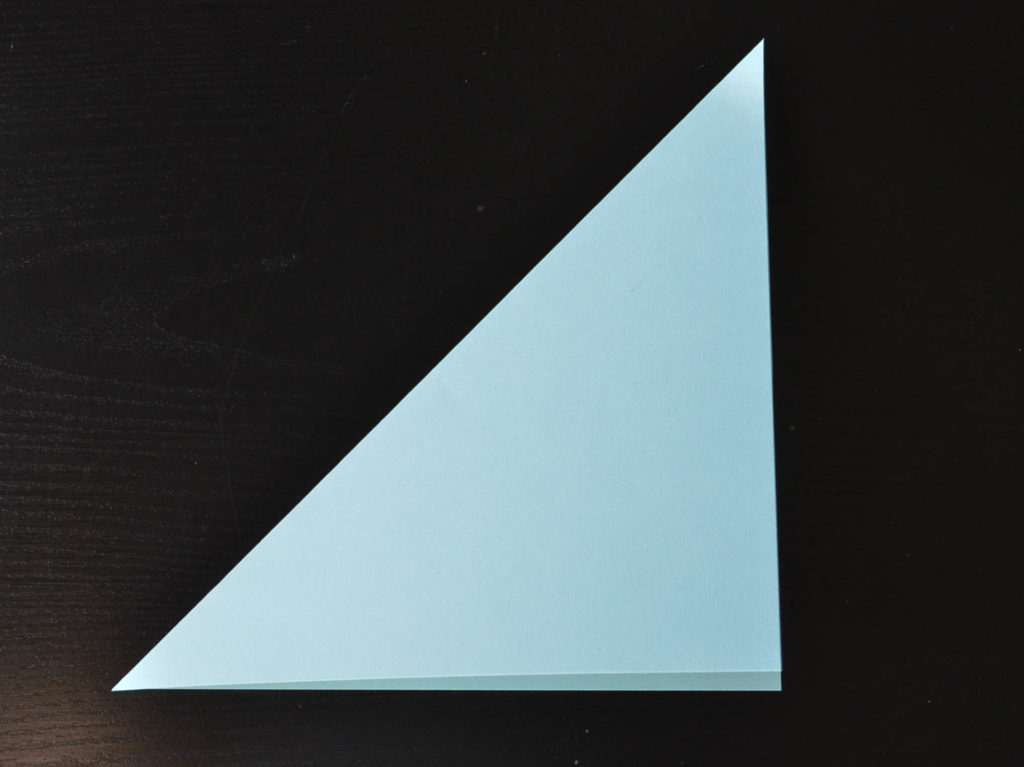
With the paper resting “lengthwise”, fold the right corner over to the left side of the page and crease the paper into a “right triangle”.
![]()
Step 2:
Trace a line with a pencil along the edge of the fold. This will be your guideline to make the piece of paper into a perfect square. Using your scissors, cut along the line to create a perfect square.


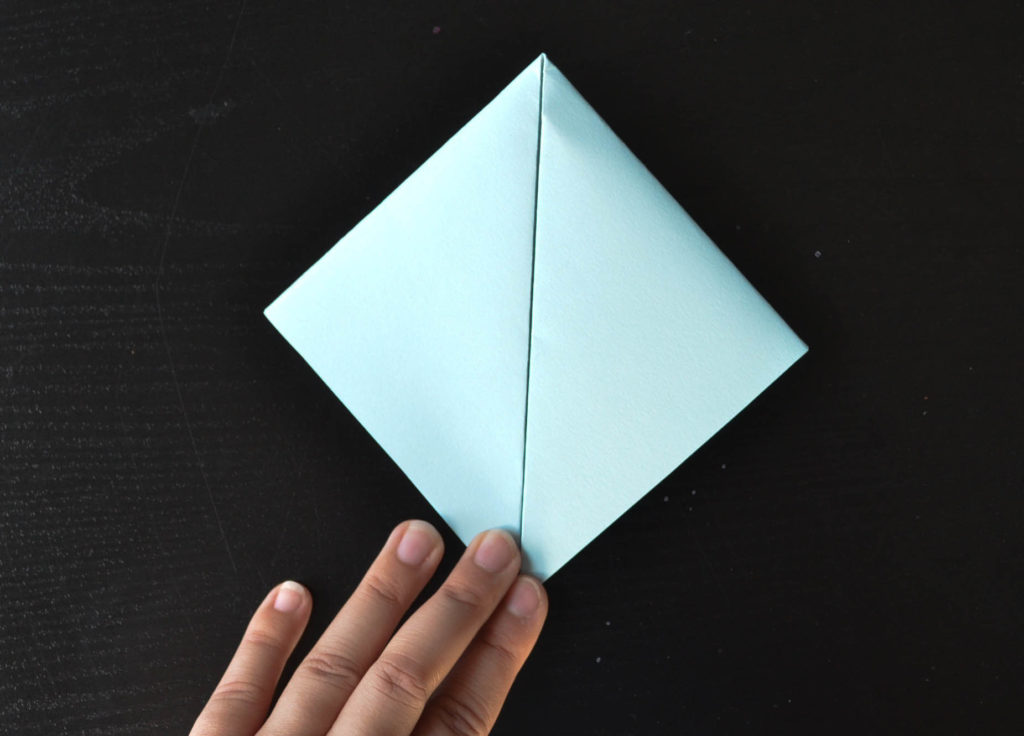
Step 3:
Fold the square in half along the existing fold.
Step 4:
Fold the long edges into the center point of the triangle on both sides.
Step 5:
Unfold both sides and bring the top layer of the center point to the top of the page.


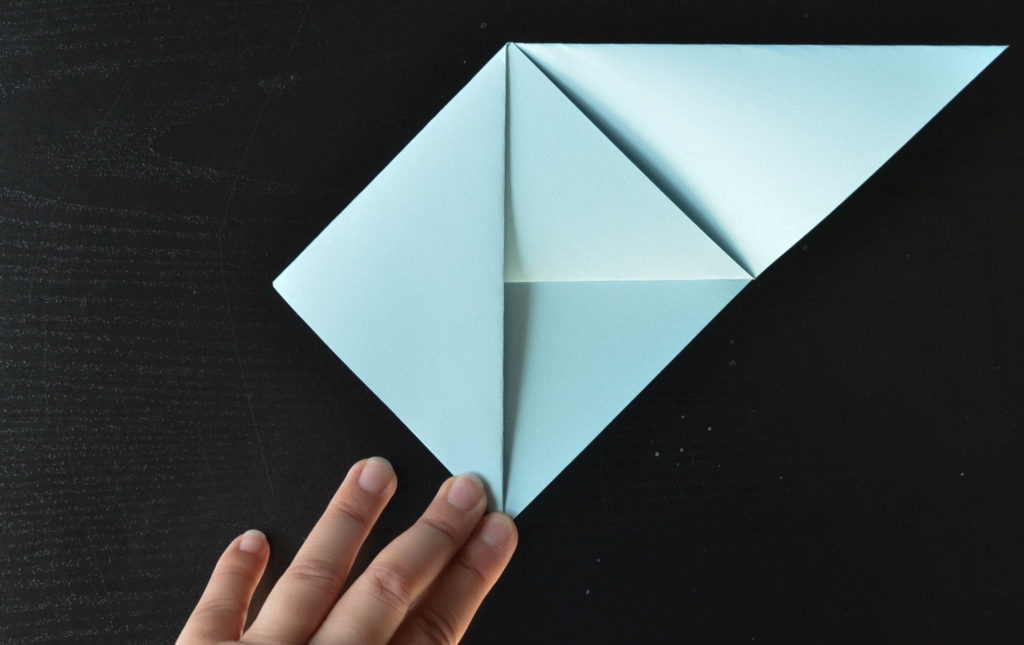
Step 6:
Fold back down the long points to the center point, then “tuck” the tips of the paper into the top triangle. This will create a pocket as seen below:


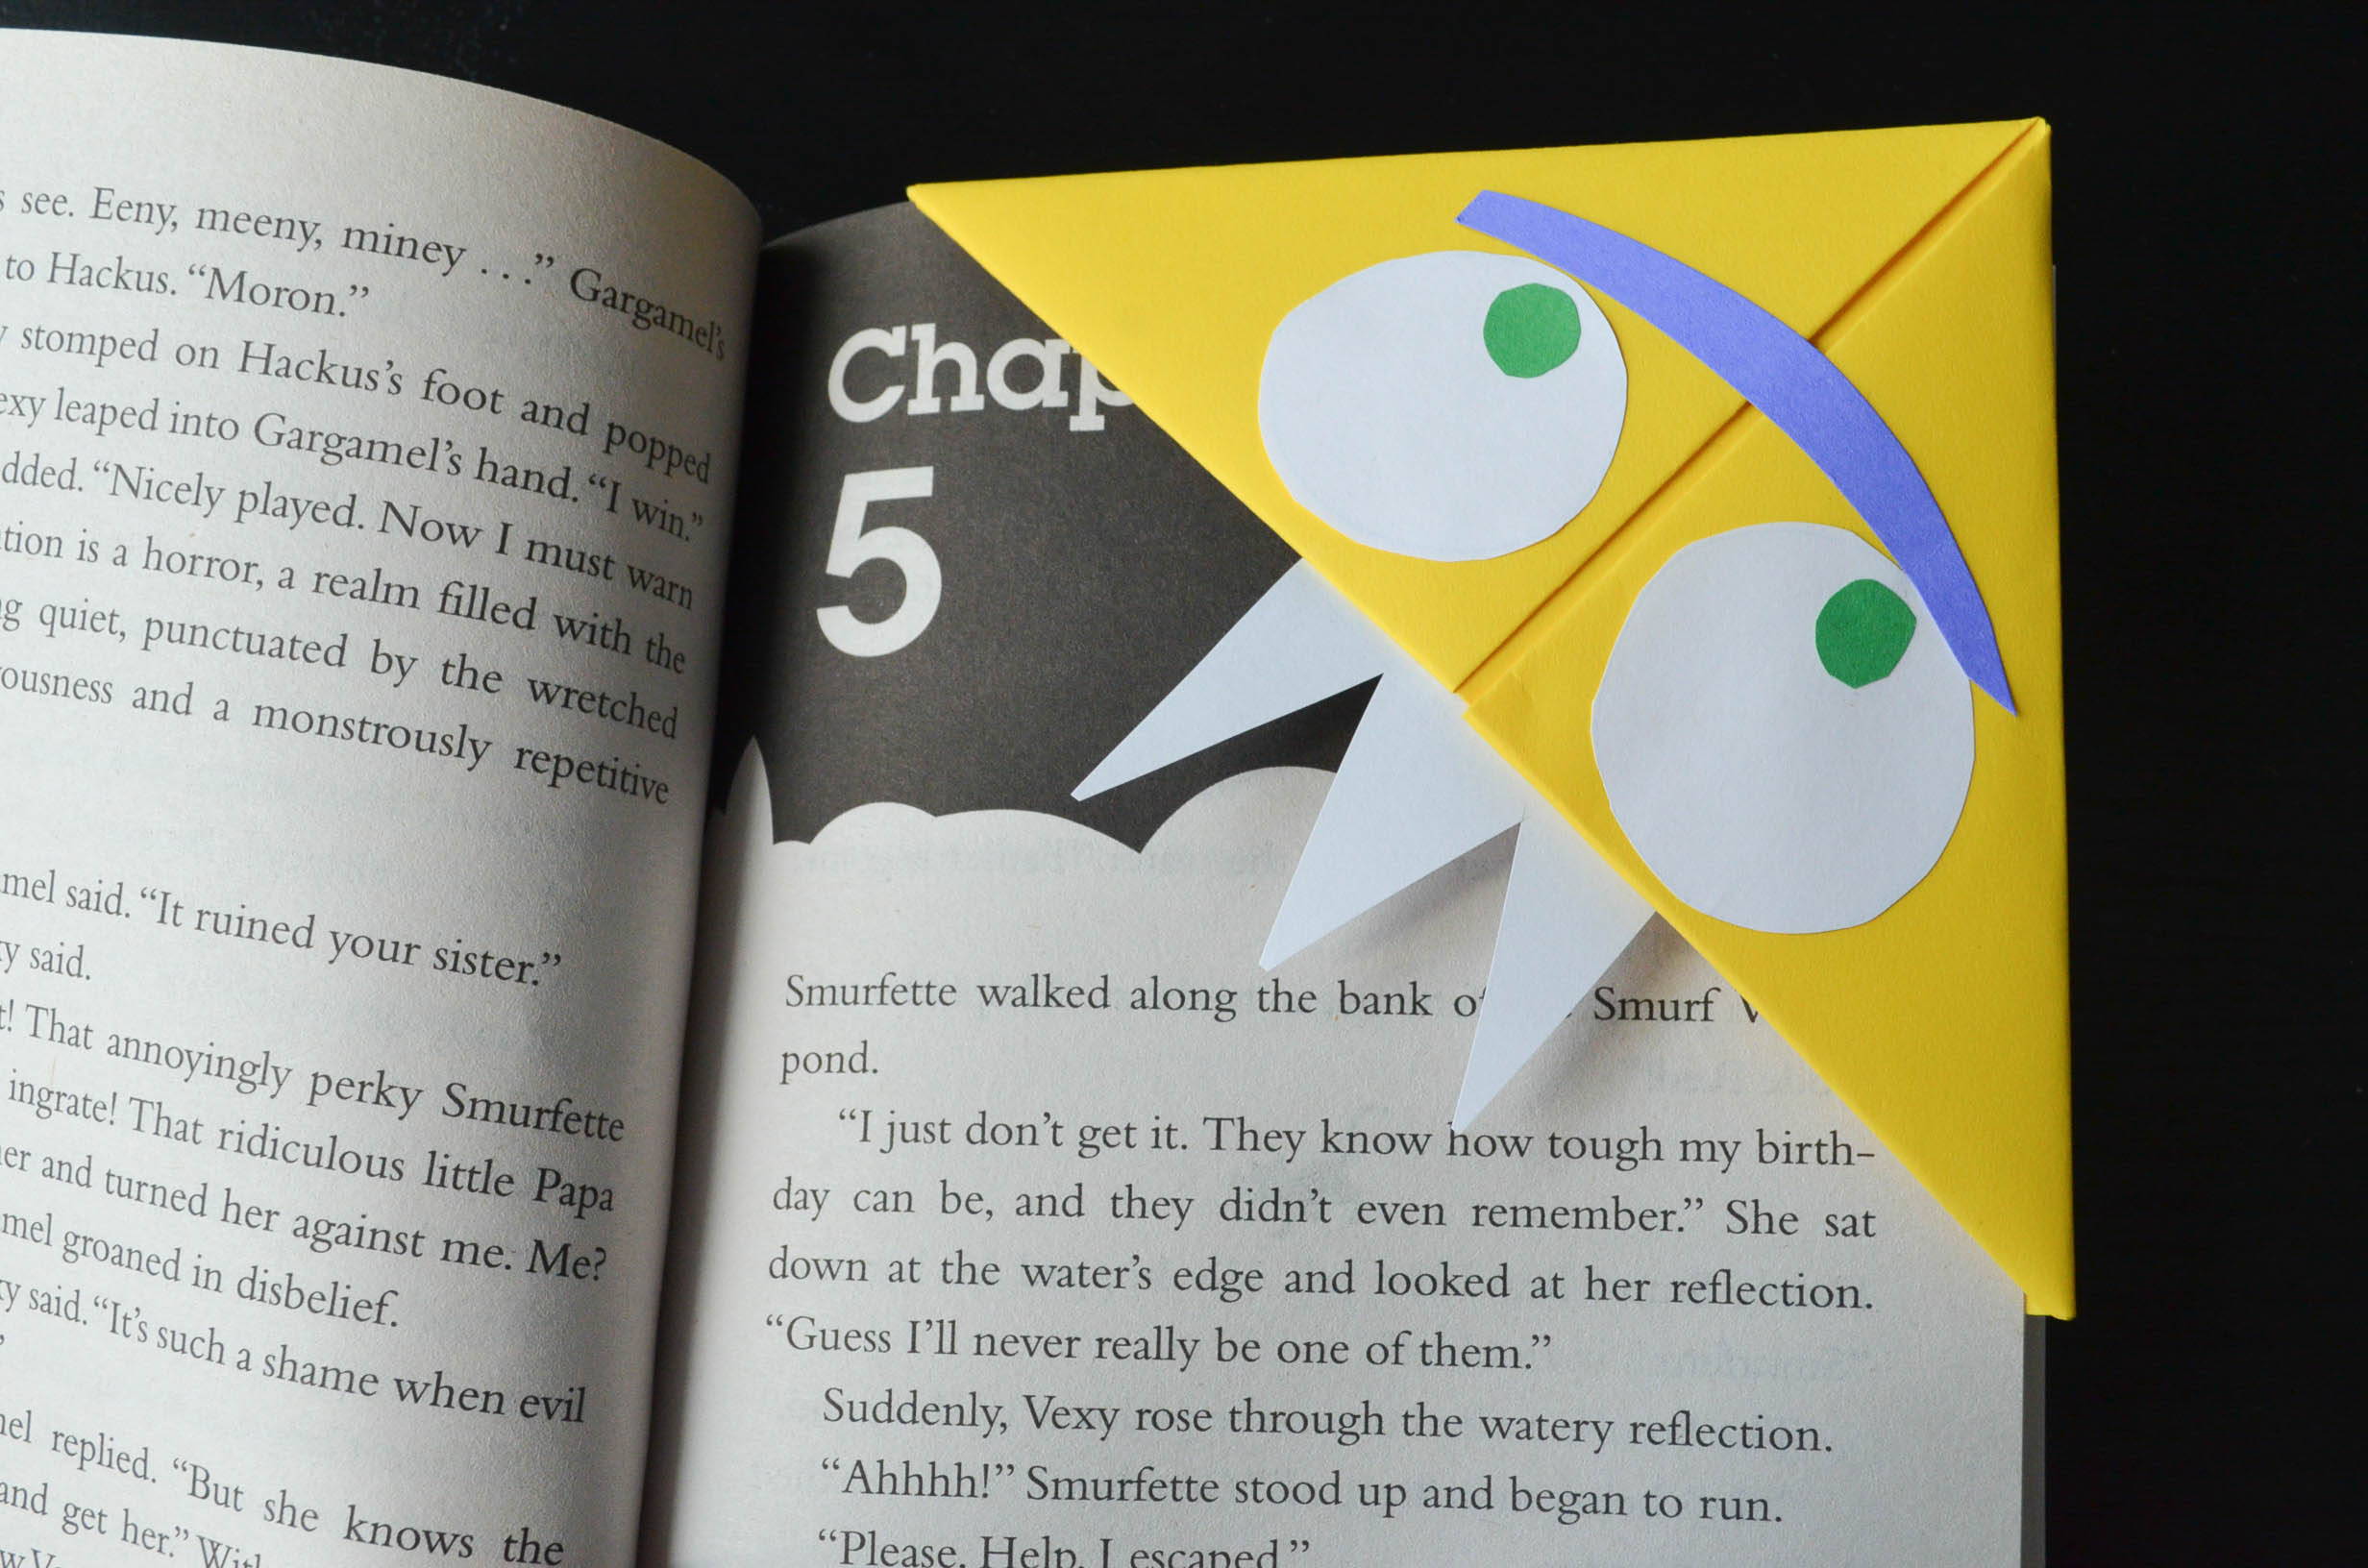
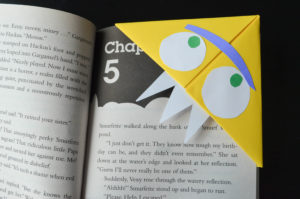
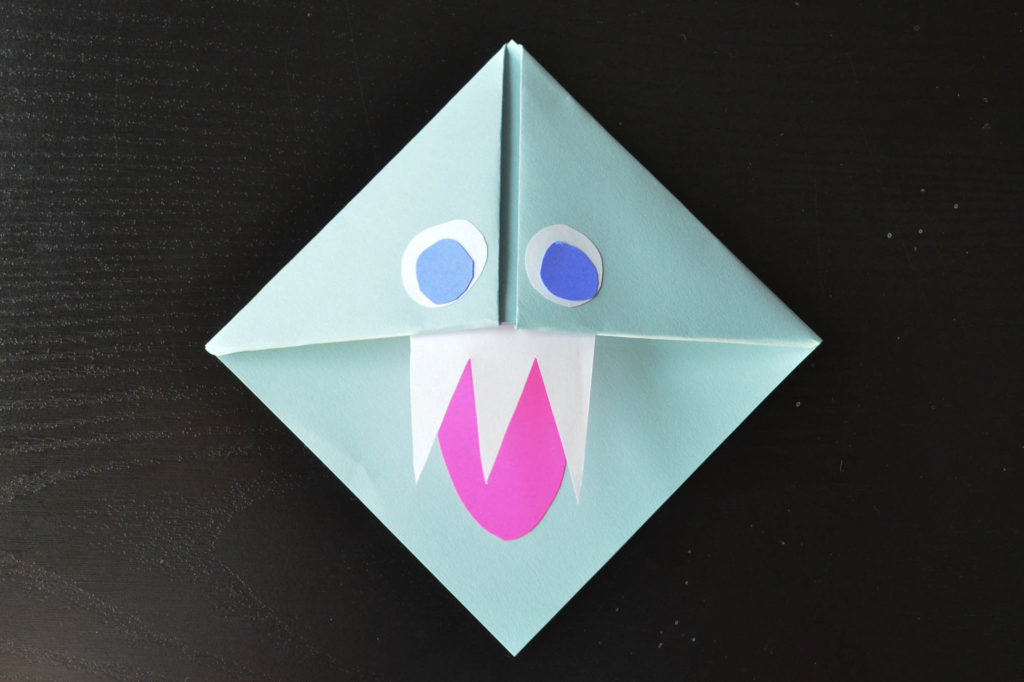
Step 7: Creating the face
This is the moment when creativity takes charge. Encourage your children to make the features they think will best suit their friendly monster. We chose to have sharp teeth and a bright pink tongue.
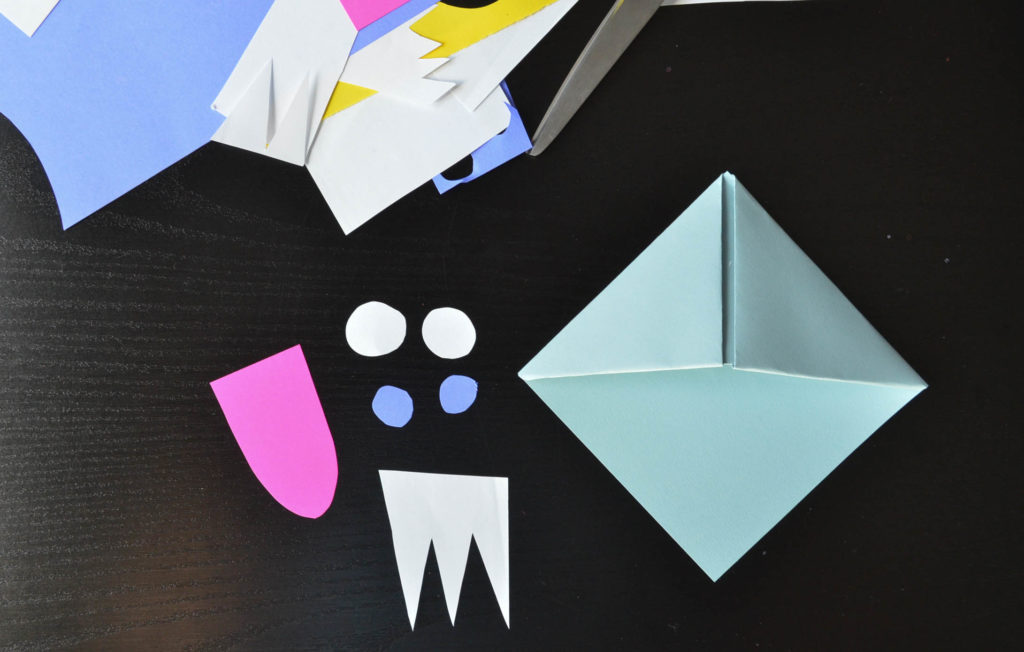
Step 8: Assemble
Using a glue stick, attache the features onto the bookmark. Be sure to glue the teeth to the inside of the top flap so that the teeth show when the bookmark is in use!


Step 9: Read and save your page!

Happy Halloween!
 Rebecca Ustrell, Community Outreach Coordinator
Becky acts as liaison for Children’s Foundation of America. On any given day she could be meeting with potential donors, coordinating a fundraising event, recruiting volunteers and forming partnerships with other nonprofits that can benefit from the help of our Foundation. Becky is currently studying sociology as well as fine art and helps organize the Claremont Art Walk. You will most likely find Becky working on freelance illustrations, playing the cello, mingling at a chamber of commerce event or volunteering in the community.
800-543-7730 | rustrell@trinityys.org

National Friendship Day: Allie and Drew’s Friendship Quilt

August 6 is National Friendship Day. National Friendship Day gives you the perfect opportunity to discuss the meaning of friendship with the children in your life. We spent the afternoon with Allie and Drew to create a visual representation of the different activities friends can do together.
What You Will Need:
- Scissors
- Hole Punch
- Glue Sticks
- Yarn
- Crayons or Colored Pencils
- 9-12 Square Sheets of Colored Paper
- 9-12 Slightly Smaller Sheets of White Paper
- 1 8.5 X 11 Sheet of While Paper
Your Work Space:
The best work space for this project would be in a communal area of the home where there is a flat surface to work on. What’s great about creating a friendship quilt is that your children have full creative freedom! Each square will become it’s own masterpiece!

Step 1:
Brainstorm! Ask your children to think of a few different things they can do with a good friend. Next, equally divide the white squares to your children and let them draw a picture to represent each activity.

Step 2:
Once all of the white squares have a completed picture, glue the white square onto a colorful square sheet of colored paper. Be sure the white square is glued in the center of the colored paper sheet so that it leaves a visible border.

Step 3:
Using the white 8.5 X 11 sheet of white paper, create a name for your Friendship Quilt and make a colorful sign for it. This sign will be a collaborative art project between the children creating the quilt squares.

Step 4:
Lay out all squares into a grid design. This is an opportunity for everyone creating the quilt to agree upon a composition. Next, punch holes approximately a half inch from the edge of the quilt squares on each side that a stitch will be required. Using yarn, stitch the squares together using a simple knot or bow for each stitch. Lastly, attach the sign to the top of the quilt using three stitches.
Finishing Touches
Punch two holes at the top of the paper and tie a long piece of yarn through each hole and hang your creation!
 Have a Discussion
The best part about creating a friendship quilt is the discussion you have following the craft explaining what each quilt square represents. Here is what Allie and Drew came up with when asked, “What are some things you like to do with your friends?” (from top left to bottom right):
Allie: “Eat ice cream.”
Drew: “Go to a baseball game.”
Drew: “Go shopping. This is a cowboy boot, a high heel, and a flip flop.”
Allie: “Have fun at school together.”
Drew: “Go to the zoo. This is a tiger!”
Allie: “Playing at a friend’s house.”
Allie: “Watch Minions at the movies.”
Drew: “Walk through a maze together.”
Allie: “You can go bowling.”
Allie: “Go to the park and play on the slide.”
Drew: “You can play outside together. This is me and my papa!”
Drew: “You can go to church together! This is the church and the different doors.”
Rebecca Ustrell, Community Outreach Coordinator
Becky acts as liaison for Children’s Foundation of America. On any given day she could be meeting with potential donors, coordinating a fundraising event, recruiting volunteers and forming partnerships with other nonprofits that can benefit from the help of our Foundation. Becky is currently studying sociology as well as fine art and helps organize the Claremont Art Walk. You will most likely find Becky working on freelance illustrations, playing the cello, mingling at a chamber of commerce event or volunteering in the community.
800-543-7730 | rustrell@trinityys.org
Simple Blanket With Fringe Craft

Nothing says comfort like a cozy blanket made especially for you! Making this no-sew blanket is as easy as 1-2-3. Combine your favorite colors to create unique blankets for your children to snuggle up with.
What You Will Need:
- Scissors
- Crochet Hook
- Clothes Pins
- Fleece Fabric
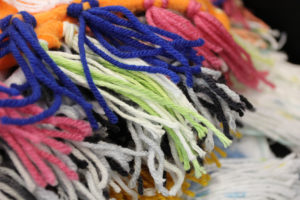
- Assorted Yarn
- Ruler

Your Work Space:
Be sure and choose a comfortable spot to create your blanket. Since there is no mess you can easily spread out your craft supplies on the coffee table or on the couch. For our blanket, we choose a combination of bright and soft colors for the fringe. Keep in mind that you can also use chunky yarn for a fluffier effect. Make it your own!
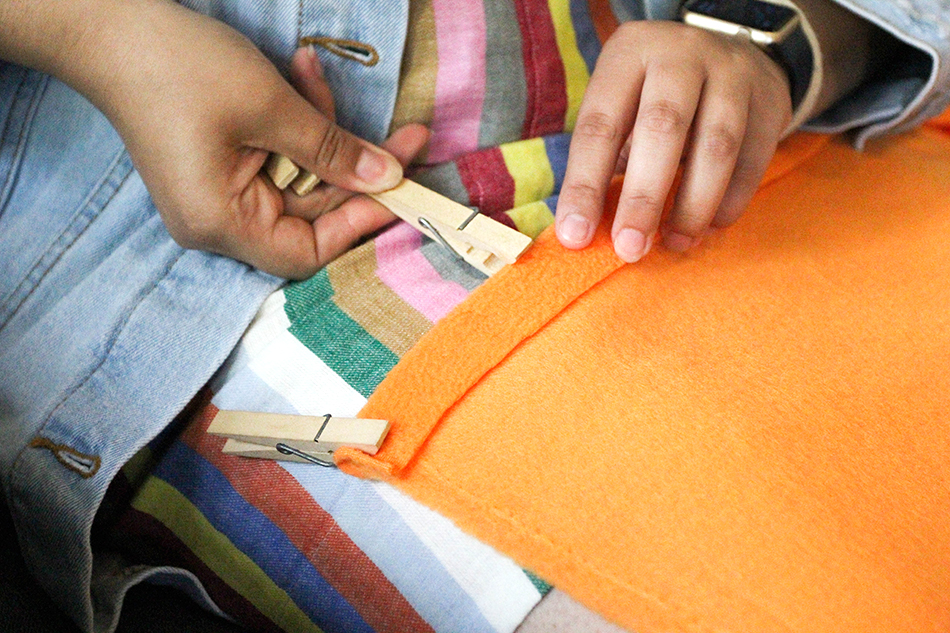
Step 1:
Start at the corner of your fleece blanket and fold along the edge about 1 inch. Hold the fold in place using clothes pins. Do this along the entire edge of the blanket.


Step 2:
Make small cuts along the fold of the blanket about 1/2 inch long and 1-2 inches apart.
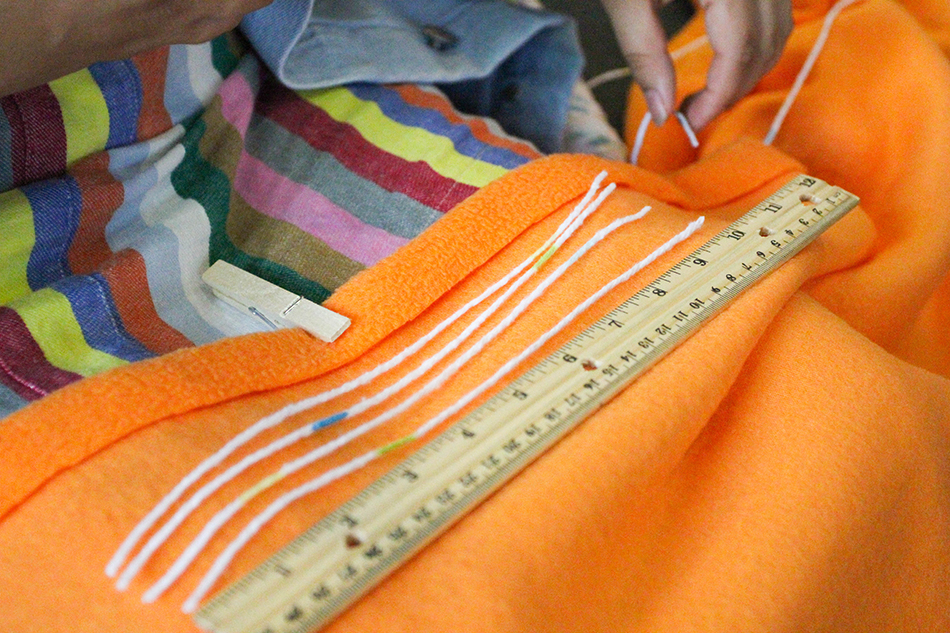
Step 3:
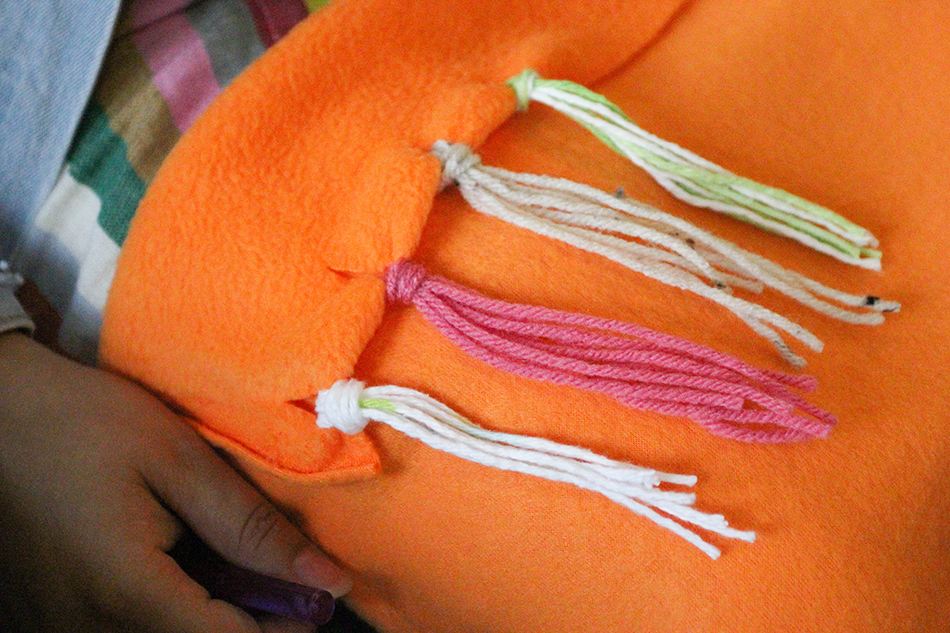
Choose your favorite yarn and cut 10-inch strips. This will become the fringe that will be attached along the edge of the blanket. You will need to cut approximately 4 strips per hole.
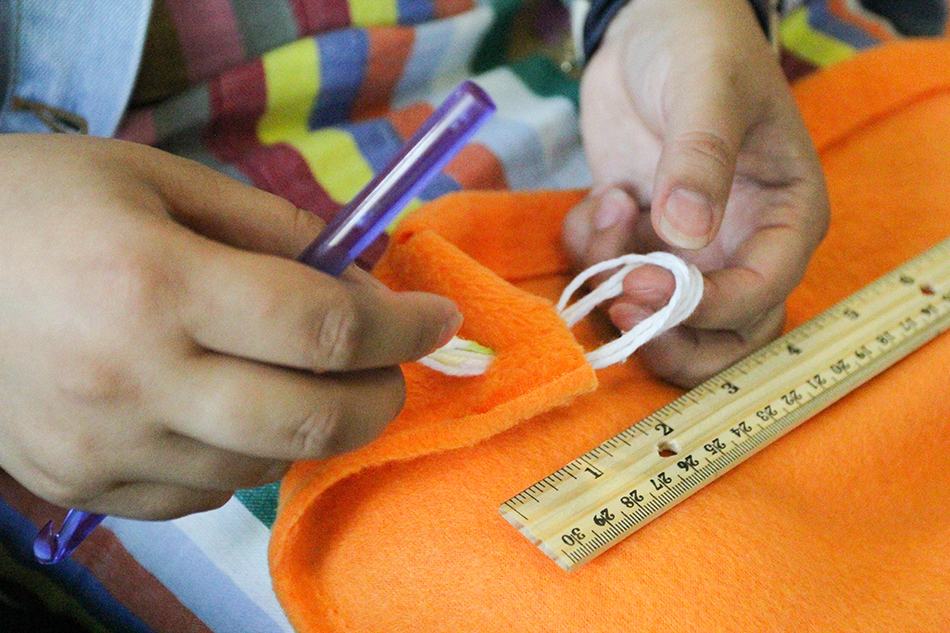

Step 4:
Gather all four strips of yarn and fold them in half. Using a crochet hook, pull the looped end through the first hole. Pull the ends of the yarn through the loop and tighten into a knot. Repeat this step along the entire edge of the blanket.
Mix It Up
Remember to have fun with your blanket. Using an assortment of colors can add a cheerful characteristic. The important thing is that you make it your own.

 Rebecca Ustrell, Community Outreach Coordinator
Becky acts as liaison for Children’s Foundation of America. On any given day she could be meeting with potential donors, coordinating a fundraising event, recruiting volunteers and forming partnerships with other nonprofits that can benefit from the help of our Foundation. Becky is currently studying sociology as well as fine art and helps organize the Claremont Art Walk. You will most likely find Becky working on freelance illustrations, playing the cello, mingling at a chamber of commerce event or volunteering in the community.
800-543-7730 | rustrell@trinityys.org

Foster Care Month Blue Ribbon Pledge Board

Happy National Foster Care month! This month is all about raising awareness and supporting foster children and their families. Each year 400,000 children are unable to live with their families as a result of trauma onset by abuse, neglect and abandonment. The Children’s Foundation of America works tirelessly to help support those children and their families in every way we possibly can.
The blue ribbon is a symbol for National Foster Care Month. We decided to make a Blue Ribbon wall to serve as a visual reminder of why we do what we do and what we pledge to do on behalf of these children and families who need it most. Sharing these walls on social media can serve as a huge inspiration to foster families and their children. It is also a great way to engage your group whether it be at the office, at home or school.
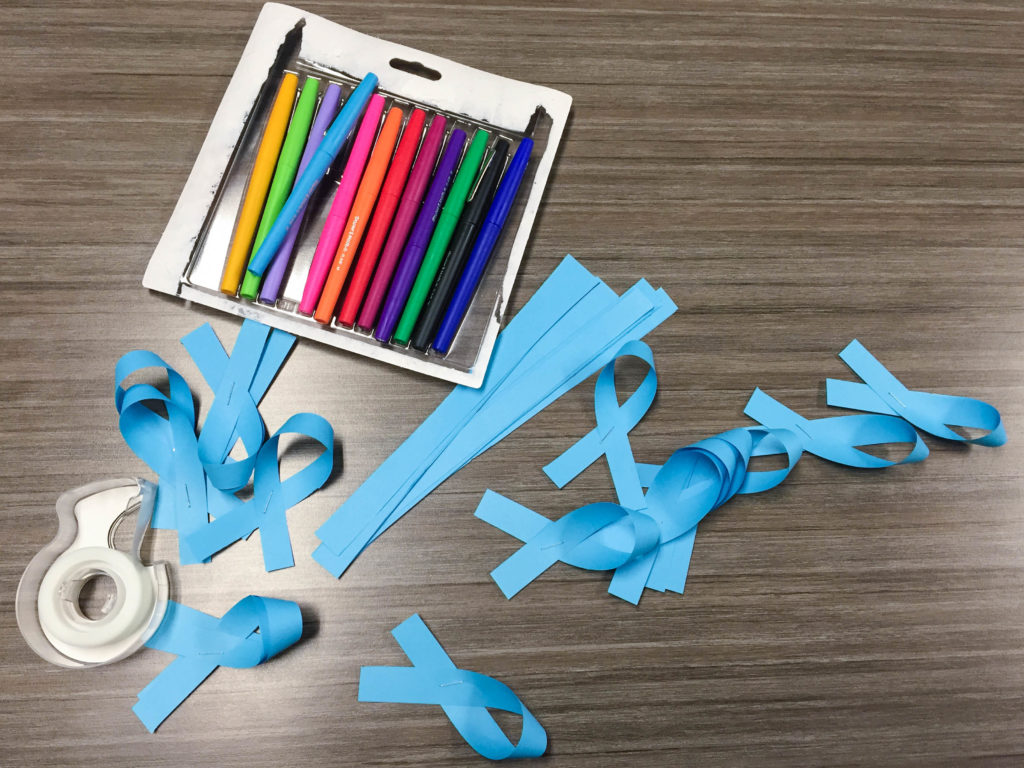
What You Will Need:
- 1 Large Poster Sized Paper
- Blue Construction Paper
- Stapler
- Scotch Tape
- Assorted Markers
Step 1:
Cut strips of blue construction paper about 8 inches long and 3/4 inch wide. Create a ribbon shape and secure the shape with a single staple in the center.
Step 2:
Get a large poster sized paper and write a message at the top for Foster Care Awareness Month. We chose to put the following: ” Foster Care Awareness Month Pledge Board”. Adding a call to action will encourage people to participate. Here’s what our call to action said: “How will you make the world a better place for children in foster care?”
Step 3:
Post your Pledge Board in a shared space. We posted our board on the door of the conference room which is in a common walk-way of the office. Share some facts about Foster Care Month with your group to encourage each person to make a pledge and post a blue ribbon onto the Pledge Board.

Step 4: Spread the Word!
Take photos of the Pledge Board throughout the month and share them on social media. Use hash tags such as #fostercaremonth, #fostercare, and #bethedifferencecfa to reach other individuals participating in Foster Care Month activities.

Rebecca Ustrell, Community Outreach Coordinator
Becky acts as liaison for Children’s Foundation of America. On any given day she could be meeting with potential donors, coordinating a fundraising event, recruiting volunteers and forming partnerships with other nonprofits that can benefit from the help of our Foundation. Becky is currently studying sociology as well as fine art and helps organize the Claremont Art Walk. You will most likely find Becky working on freelance illustrations, playing the cello, mingling at a chamber of commerce event or volunteering in the community.
800-543-7730 | rustrell@trinityys.org

Valentine’s Day Craft: Hot Air Balloon Candy Catcher
 We’ve found a Valentine’s Day craft that has really captured our heart. It’s not only cute, but functional too! This colorful, heart-shaped paper hot air balloon holds Valentine sweets in a paper cup bucket and can be hung from just about anywhere for easy access to tasty treats. You can make one for the kids or get them involved and make one with you!
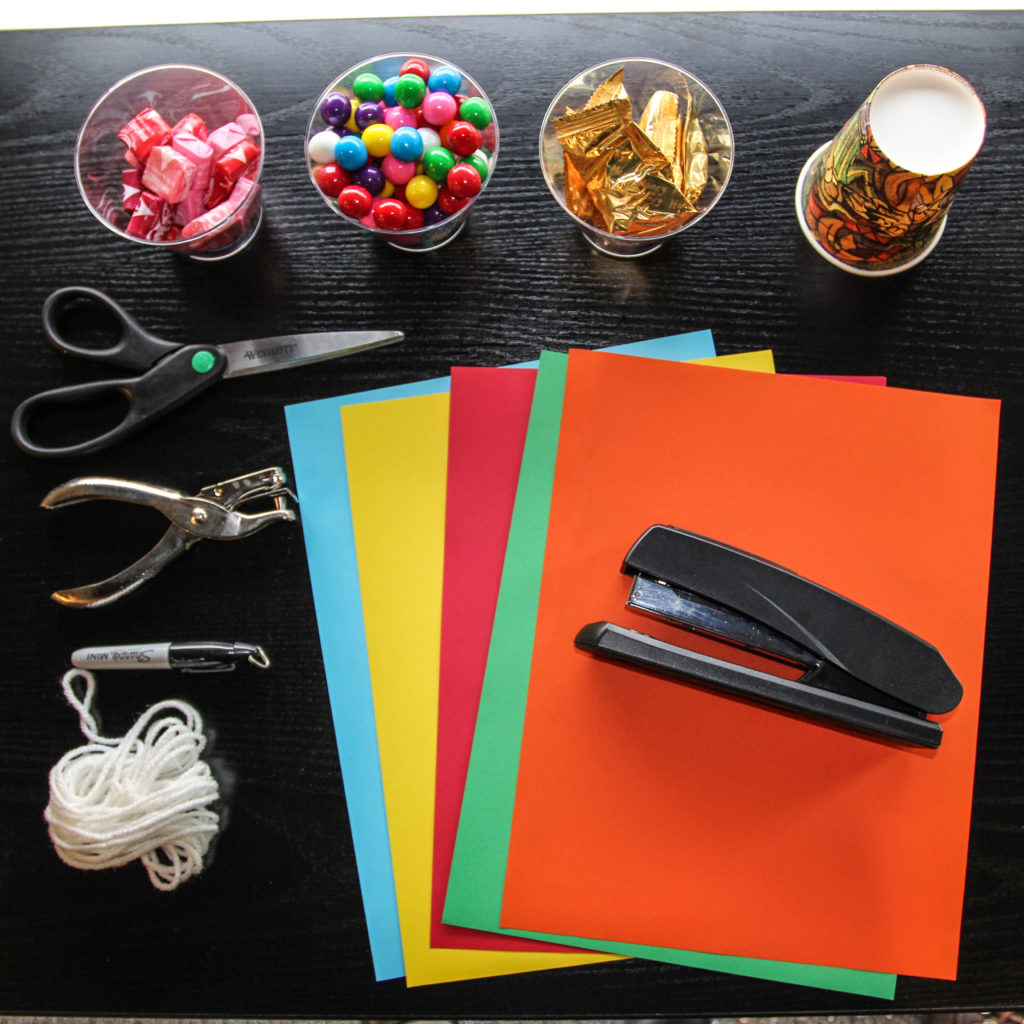
What You Will Need:
- 1 Ball of Yarn
- 1 Paper Cup
- 1 Marker or Pencil
- Scotch Tape
- Hole Punch
- Stapler
- 5 Pieces of Construction Paper
- Assorted Candy
 Your Work Space:
Make sure to have ample space to spread out your craft supplies. For our assorted candies, we chose colorful treats to match our multicolored paper balloon. You can choose your favorite color combinations for the paper and for the candies! Make it your own style. You can even draw or color on the paper for extra customization.
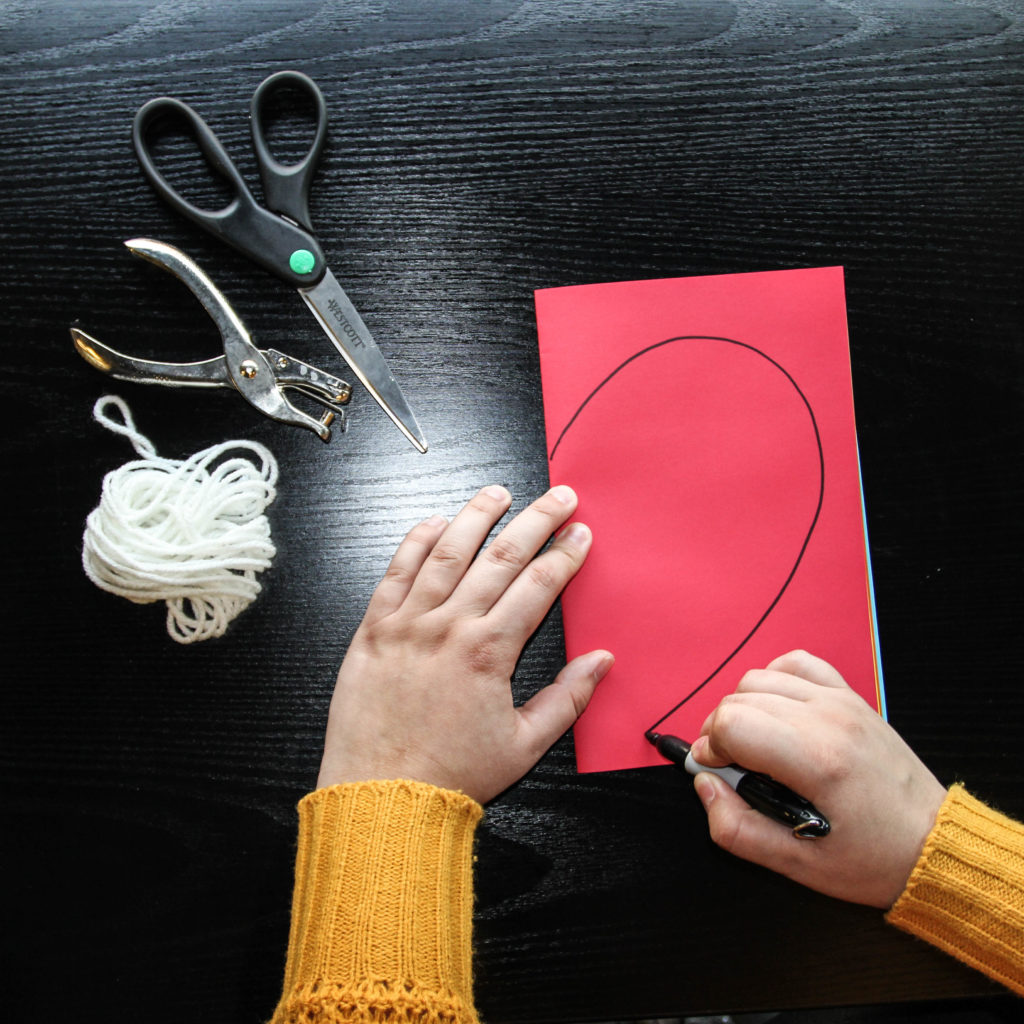 Step 1:
Stack all pieces of paper and fold them in half horizontally. Use a marker or pencil to trace a half-heart shape onto the paper along the fold. Cut the half heart shape out of the stack of paper along the line you traced.
 Step 2:
Unfold the stacked paper being sure to keep all of the pieces stacked evenly. Staple along the fold crease twice to secure the bottom half. Punch one hole on the center fold crease approximately a half inch from the top.
Once the heart shape is secure and hole punched, it’s time to start assembling the structure of the balloon!
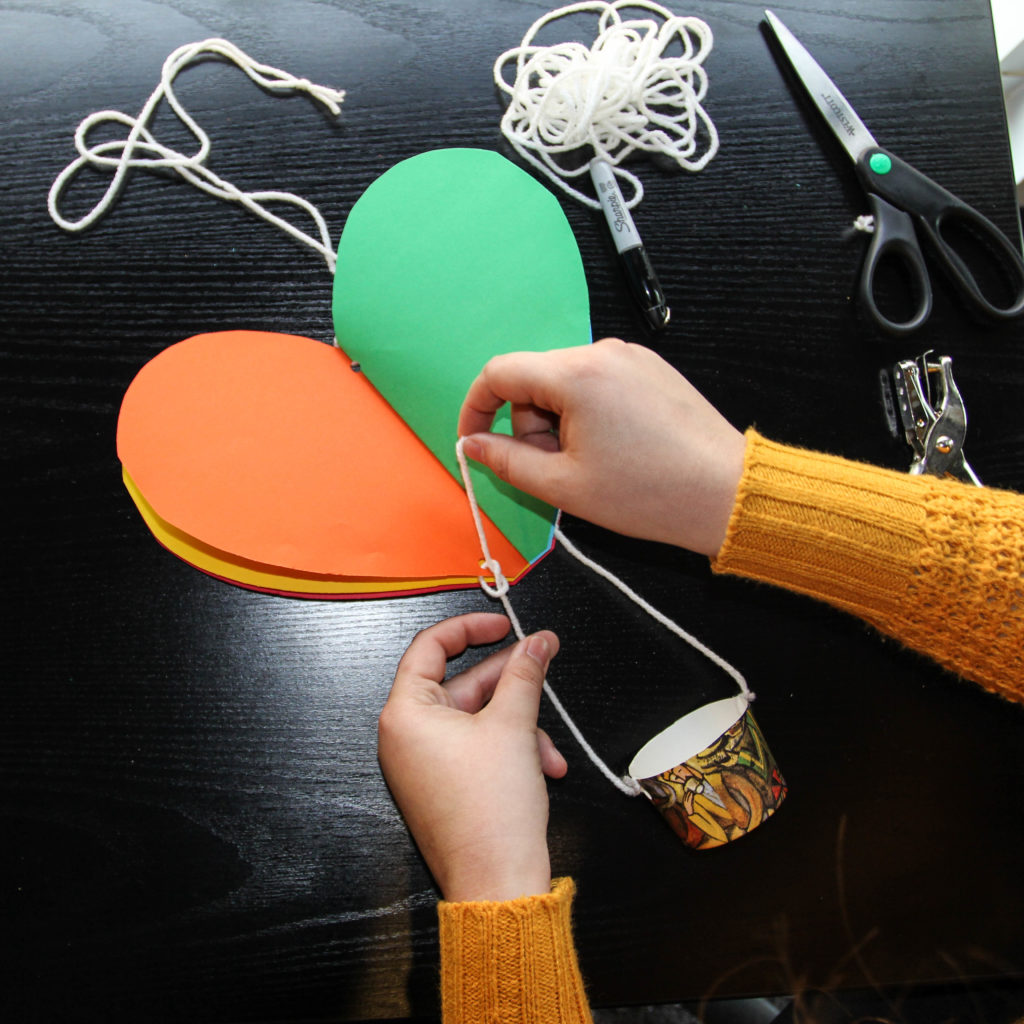
Step 3:
Thread the yarn through the top hole punch and tie a knot at the end to create a loop. This can be as short or long as wish. If you are making multiple hot air balloon candy catchers, consider making the loops different lengths to give height variation in your display.
Punch one hole approximately a half inch from the base of the center piece of paper on each side. Cut off the top of the paper cup so it is only about 2 inches tall from the bottom. Punch two holes on opposite sides of the cup just below the top edge. Next, thread a piece of yarn through from the paper to the paper cup on each side securing it with a double knot.
 Step 4:
It’s candy time! Fill the paper cup with your Valentine’s favorite candy. The more colorful the better!
Find someplace to hang your hot air balloon to surprise your Valentine. Happy Flying!
Rebecca Ustrell, Community Outreach Coordinator
Becky acts as liaison for Children’s Foundation of America. On any given day she could be meeting with potential donors, coordinating a fundraising event, recruiting volunteers and forming partnerships with other nonprofits that can benefit from the help of our Foundation. Becky is currently studying sociology as well as fine art and helps organize the Claremont Art Walk. You will most likely find Becky working on freelance illustrations, playing the cello, mingling at a chamber of commerce event or volunteering in the community.
800-543-7730 | rustrell@trinityys.org